Installing the Front Suspension!!
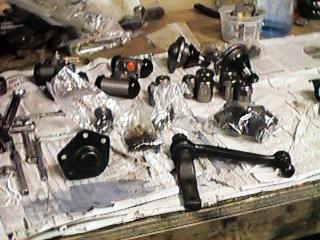 I replaced all high wear parts in the front suspension, including ball
joints idler arm, shaft bushings, etc. This is what I got in the standard kit
from Kanter, plus an idler arm. I bought all new brake cylinders as well.
I replaced all high wear parts in the front suspension, including ball
joints idler arm, shaft bushings, etc. This is what I got in the standard kit
from Kanter, plus an idler arm. I bought all new brake cylinders as well.
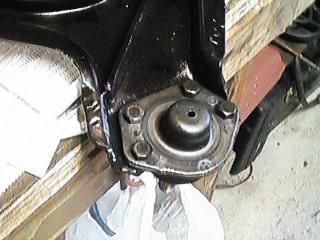 Installing the ball joints took no time at all. I just bolted them
on. Notice the hole in the top. This will be filled by a grease nipple before
the arm is installed on the car.
Installing the ball joints took no time at all. I just bolted them
on. Notice the hole in the top. This will be filled by a grease nipple before
the arm is installed on the car.
 Now I've got the arm back on the car. Notice the nice new shaft bushings.
I elected not to replace the shafts, since the looked perfect after I bead blasted
them.
Now I've got the arm back on the car. Notice the nice new shaft bushings.
I elected not to replace the shafts, since the looked perfect after I bead blasted
them.
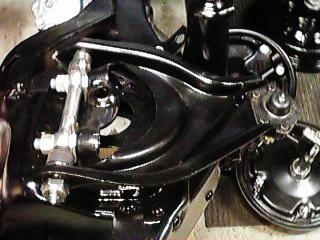
 After I got the top A-arms in place I started on the bottoms. First I installed
the ball joints, then bolted on the axial unit. After that I added the shaft and
bushings, and bolted it to the car.
After I got the top A-arms in place I started on the bottoms. First I installed
the ball joints, then bolted on the axial unit. After that I added the shaft and
bushings, and bolted it to the car.
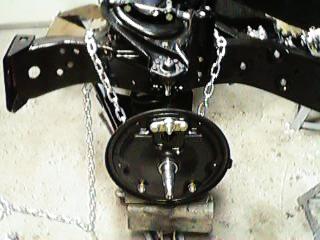 One of the most challenging things is getting the coil springs compressed
enough to join the top and bottom A-arms. The manual says that you can use a floor
jack to compress the spring. This is not completely true. I used a floor jack
pushing up, then wrapped a chain around in case the jack slipped. Then I used
a come along to squeeze the top and bottom joints together. One of the most satisfying
feelings I've had is getting that top ball joint nut treaded down. Another good
technique I learned after doing this is to make up a threaded rod which pulls
the bottom arm up through the shock tower. I have a buddy (Ed Mobely) that did
it this way, much safer than the chain and jack method.
One of the most challenging things is getting the coil springs compressed
enough to join the top and bottom A-arms. The manual says that you can use a floor
jack to compress the spring. This is not completely true. I used a floor jack
pushing up, then wrapped a chain around in case the jack slipped. Then I used
a come along to squeeze the top and bottom joints together. One of the most satisfying
feelings I've had is getting that top ball joint nut treaded down. Another good
technique I learned after doing this is to make up a threaded rod which pulls
the bottom arm up through the shock tower. I have a buddy (Ed Mobely) that did
it this way, much safer than the chain and jack method.
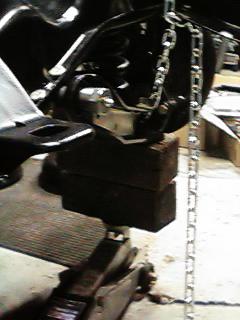 Here I have the jack in place with wood blocks to get the right height
and angle. I jacked the spring up some, and then took up the slack in the chain.
The front end was lifted off jack stands by the pressure!!
Here I have the jack in place with wood blocks to get the right height
and angle. I jacked the spring up some, and then took up the slack in the chain.
The front end was lifted off jack stands by the pressure!!
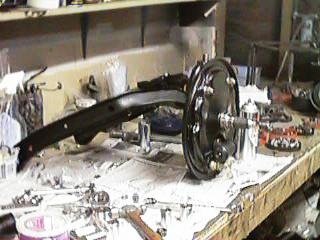
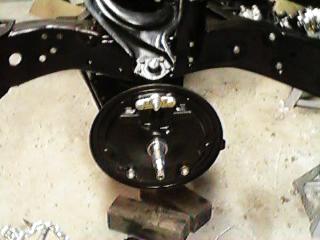 And here is the finished product, ready for brakes and tire.
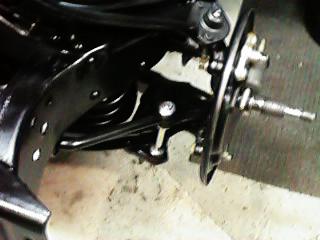 After the Springs are both in, I installed the sway bar. This was pretty
easy, but required several attempts to get everything to match up.
After the Springs are both in, I installed the sway bar. This was pretty
easy, but required several attempts to get everything to match up.
Home
Author: Bill McKenna
email bill@mckennasgarage.com