Body Work Begins!
Hard to calculate
the time for body work, however I'd estimate that about 100 hours of work went
into the door skinning and patching the sills etc. This was done over June July
and Aug 2002.
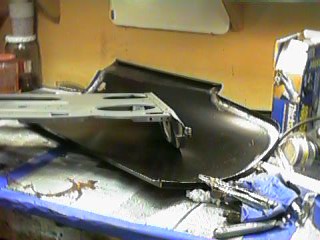
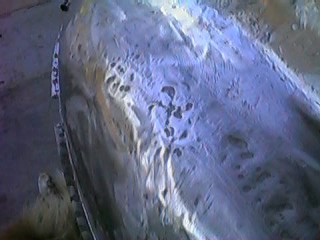 The rear fenders
were rippled pretty badly, I have no idea how the fenders got this way, but it
was clear that a previous repairer had done quite a bit of hammering on these
before covering the entire mess with bondo. I'll be leading these later in the
body work process.
The rear fenders
were rippled pretty badly, I have no idea how the fenders got this way, but it
was clear that a previous repairer had done quite a bit of hammering on these
before covering the entire mess with bondo. I'll be leading these later in the
body work process.
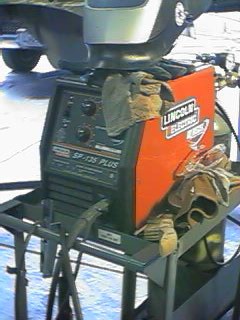 Mig welding is
the way to go for this kind of project. I chose the lincoln SP-135 Plus. It would
have been impossible to do most of this work without it. It has variable tap power
so it can be adjusted to the voltage level avoiding burn through. I find that
for 20 gauge steel just below D and 5-6 on the wire speed is the perfect setting.
For thicker sheet metal like roof rails etc. I use the E setting and 7 on wire
speed. I've done 1/8" thick work before with it set to G or H. I use it with
argon shield gas, and .023" wire. Interesting to note. The argon goes pretty
quickly I use about three 150 pound tanks for every 3 pound spool of wire at 20-25
cfm.
Mig welding is
the way to go for this kind of project. I chose the lincoln SP-135 Plus. It would
have been impossible to do most of this work without it. It has variable tap power
so it can be adjusted to the voltage level avoiding burn through. I find that
for 20 gauge steel just below D and 5-6 on the wire speed is the perfect setting.
For thicker sheet metal like roof rails etc. I use the E setting and 7 on wire
speed. I've done 1/8" thick work before with it set to G or H. I use it with
argon shield gas, and .023" wire. Interesting to note. The argon goes pretty
quickly I use about three 150 pound tanks for every 3 pound spool of wire at 20-25
cfm.
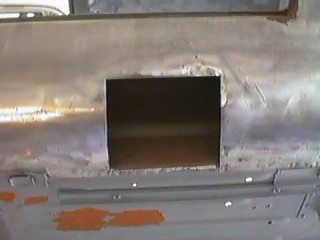
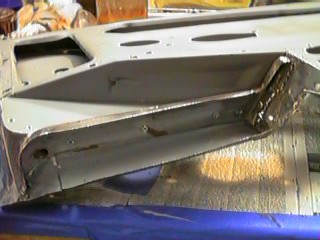
Before sandblasting
the damaged areas in the sills were cut out, giving access to the inner sills.
The blaster removed all of the rust and old paint and I repainted these areas
with POR 15 and then waxed over the paint before welding in patches. Previous
repairers drilled and pulled dents out in these areas, stretching the metal
beyond practical repair. It was nice having the sills open so a complete inspection
could be made of the inner sills and any rusted areas discovered. Fortunately
there was almost no rust on the inside of the sills.
 The patches for
the Sills will be cut out of 20 gauge steel and rolled into shape by hand. I cut
a cardboard pattern for each hole, then scribed the outline on to the sheet metal
stock. To get the right shape I used the sill as a template. Just lay the metal
down on the sill and bend the curve until it matches. I annealed the sheet metal
first so it would bend by hand with little hammering. To anneal, just use a torch
to heat the steel up to around 1000 degrees. It takes a little practice, but you
can tell when the steel is right as it bends freely without spring back.
The patches for
the Sills will be cut out of 20 gauge steel and rolled into shape by hand. I cut
a cardboard pattern for each hole, then scribed the outline on to the sheet metal
stock. To get the right shape I used the sill as a template. Just lay the metal
down on the sill and bend the curve until it matches. I annealed the sheet metal
first so it would bend by hand with little hammering. To anneal, just use a torch
to heat the steel up to around 1000 degrees. It takes a little practice, but you
can tell when the steel is right as it bends freely without spring back.
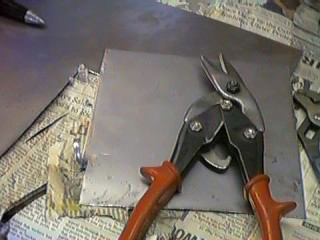
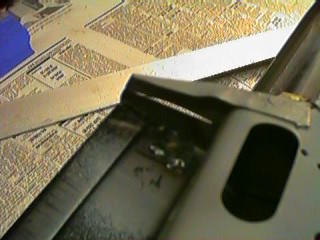
I used standard
tin snips for most work, I have an air nibbler and electric cutting wheel, but
find them harder than the snips. I usually cut the panel a few mil larger than
I need and then grind it into perfect shape with an angle grinder. The goal
is to get the panel to fit with 1 millimeter gap. This is easily filled when
welding in the panel. Larger gaps can also be filled with the mig welder, but
these make weaker welds and require more grinding. Its not an exact science
but the better the fit the better the weld, and the better the final finish,
meaning less lead or plastic filler to cover the seams.
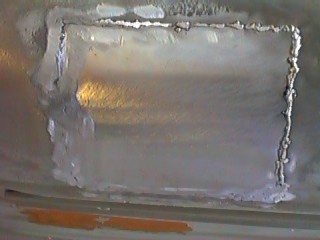
 Here is a panel
freshly welded in. When welding sheet metal, always stitch weld. Weld small areas
less than an inch in any one area at a time. Let the metal in one area cool while
doing another part of the weld. I usually start by tack welding in the panel,
then put more tack welds are two or three inches apart, then go around and fill
each gap a little at a time. If you overhead the panel it will warp, especially
on the body side, this makes more work filing and filling and overall a worse
job. Use the discoloring as a heat guide. try to keep the discoloring as localized
and small as possible. Turn the heat down on the mig welder to C if needed, especially
if the surrounding metal is thin from grinding.
Here is a panel
freshly welded in. When welding sheet metal, always stitch weld. Weld small areas
less than an inch in any one area at a time. Let the metal in one area cool while
doing another part of the weld. I usually start by tack welding in the panel,
then put more tack welds are two or three inches apart, then go around and fill
each gap a little at a time. If you overhead the panel it will warp, especially
on the body side, this makes more work filing and filling and overall a worse
job. Use the discoloring as a heat guide. try to keep the discoloring as localized
and small as possible. Turn the heat down on the mig welder to C if needed, especially
if the surrounding metal is thin from grinding.
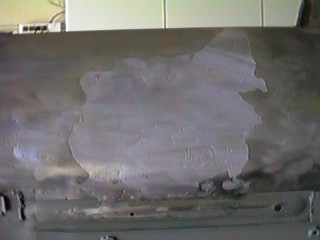
 After the weld
is done, wire wheel the area to clean the welds and to see how solid they are,
often you'll find pin holes in the welds which need to be filled. after you fill
the obvious holes grind down the welds and inspect again. Try not to grind the
surrounding metal as it will become thin. I tend to use 36 grit flap disk on a
four inch angle grinder for this. after I've got the grinds down to about the
level you see on the left, I use a 60 grit wheel to finish up. Avoid burning the
metal, or thinning out the panels. Often after you grind down the welds you find
more areas which need to be touched up with the welder. make one or two more passes
through this to get it looking good.
After the weld
is done, wire wheel the area to clean the welds and to see how solid they are,
often you'll find pin holes in the welds which need to be filled. after you fill
the obvious holes grind down the welds and inspect again. Try not to grind the
surrounding metal as it will become thin. I tend to use 36 grit flap disk on a
four inch angle grinder for this. after I've got the grinds down to about the
level you see on the left, I use a 60 grit wheel to finish up. Avoid burning the
metal, or thinning out the panels. Often after you grind down the welds you find
more areas which need to be touched up with the welder. make one or two more passes
through this to get it looking good.
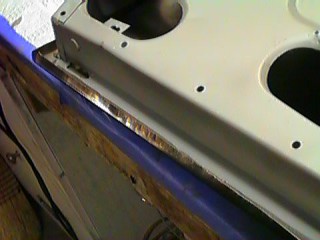
 Here is the patch
after several welding and grinding passes, ready for lead work. Its hard to avoid
some dishing of the area around the weld, so plastic or lead filler is used to
bring up the low spots, Use a pick hammer to bring down any high spots. I'd estimate
tat this patch took about four hours to get to this point. Slow work but very
enjoyable.
Here is the patch
after several welding and grinding passes, ready for lead work. Its hard to avoid
some dishing of the area around the weld, so plastic or lead filler is used to
bring up the low spots, Use a pick hammer to bring down any high spots. I'd estimate
tat this patch took about four hours to get to this point. Slow work but very
enjoyable.
 Here is the same
patch after lead work. I usually save up all the lead work until I'm sure that
I'm done welding. Lead melts at around 400F so welds anywhere near it will ruin
any lead that's been put down. Its hard to get lead perfect, so use a high build
primer or plastic filler to get the minor imperfections out.
Here is the same
patch after lead work. I usually save up all the lead work until I'm sure that
I'm done welding. Lead melts at around 400F so welds anywhere near it will ruin
any lead that's been put down. Its hard to get lead perfect, so use a high build
primer or plastic filler to get the minor imperfections out.
 Flash rust is a
real problem on bare steel, even in a dry climate like California. I found that
after a month or two,I started spending more of my type trying to keep rust from
starting than working on the car. I decided to prep and paint areas of the car
which were ready along the way. After knocking out all the dents and sanding down
the metal in any given area I cut any remaining seam sealer out, and thinned down
POR 15 seeping it between all the panels. POR 15 bonds with rust and will prevent
any rust which is in between the panels from spreading.
Flash rust is a
real problem on bare steel, even in a dry climate like California. I found that
after a month or two,I started spending more of my type trying to keep rust from
starting than working on the car. I decided to prep and paint areas of the car
which were ready along the way. After knocking out all the dents and sanding down
the metal in any given area I cut any remaining seam sealer out, and thinned down
POR 15 seeping it between all the panels. POR 15 bonds with rust and will prevent
any rust which is in between the panels from spreading.
After the POR15
I sprayed the area with PPG DP40, an epoxy primer, and applied fresh 3M seam
sealer (not shown). The metal prepping process before paint starts with a good
cleaning with a scotchbrite wheel on an angle grinder, then is followed by cleaning
with a Oil, grease and wax remover. This product is basically naptha, with a
couple other additives. After the oil and wax remover, its time for a complete
wipe down of with metal prep. Metal prep is a weak acid that opens up the pours
of the steel, and gets any remaining non oil, or wax type dirt off the steel.
It is water based and is available at any Automotive paint store in concentrated
form. usually it is mixed 3:1 with water. I put it in a spray bottle and mist
the area, let it stand on the metal for 2-3 minutes, and wipe off with a clean
rag. Make sure you wear rubber gloves and eye protection when using all of these
products, they are really hard on your hands.
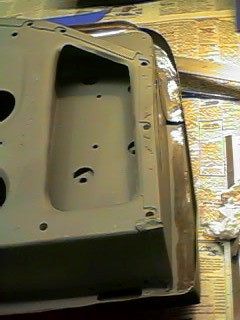
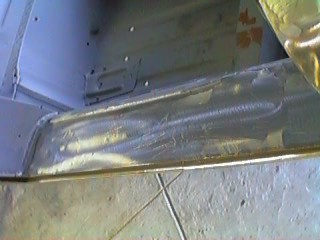 Here is the finished
repair to the inner sill. I ended up getting all but about 1/8" of the dip
out of this area. Started with over 1/4" dip. Then it was leaded to fill
the remaining space. Looks like new, ready for paint. Notice the inside of the
body is painted and I used small amounts of glazing puddy to get out minor low
spots. I don't recommend it for any major low spots as it takes forever to dry
and shrinks as it dries In these cases it was used to fill dips that were no more
than 1 Millimeter deep. I let the puddy dry for at least a month before sanding.
I'll use plastic filler or lead to surface any other dents which are to hard to
ding out.
Here is the finished
repair to the inner sill. I ended up getting all but about 1/8" of the dip
out of this area. Started with over 1/4" dip. Then it was leaded to fill
the remaining space. Looks like new, ready for paint. Notice the inside of the
body is painted and I used small amounts of glazing puddy to get out minor low
spots. I don't recommend it for any major low spots as it takes forever to dry
and shrinks as it dries In these cases it was used to fill dips that were no more
than 1 Millimeter deep. I let the puddy dry for at least a month before sanding.
I'll use plastic filler or lead to surface any other dents which are to hard to
ding out.
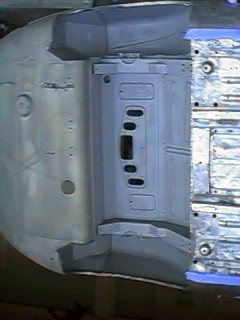
 The bottom of the
car and firewall are now ready for priming. clean, prepped and dry. I used a small
amount of tape to mask off the areas where I didn't want paint. I use a touch
up paint gun which is easy to control over spray isn't a big problem. In this
round of painting I did the firewall, inside of the car and exterior floor. It
consumed about a quart of paint.
The bottom of the
car and firewall are now ready for priming. clean, prepped and dry. I used a small
amount of tape to mask off the areas where I didn't want paint. I use a touch
up paint gun which is easy to control over spray isn't a big problem. In this
round of painting I did the firewall, inside of the car and exterior floor. It
consumed about a quart of paint.
 Here is the bottom
after paint and with a little filler. Having this part of the car primed stops
the flash rust cold and lets me focus on the upper body work. Unlike the high
end professional shops my garage isn't climate controlled so as the season turns
from summer to fall, risk of rust increases.
Here is the bottom
after paint and with a little filler. Having this part of the car primed stops
the flash rust cold and lets me focus on the upper body work. Unlike the high
end professional shops my garage isn't climate controlled so as the season turns
from summer to fall, risk of rust increases.
 Another shot of
the same, some minor dents in the floor rails were hard to get out, but I'm expecting
that after a high build primer it will not be noticeable.
Another shot of
the same, some minor dents in the floor rails were hard to get out, but I'm expecting
that after a high build primer it will not be noticeable.
 This shot of the
inside of the car is just before painting. I did the same seeping of POR 15 into
all the joints, shouldn't ever rust again if this stuff is as good as they say.
This shot of the
inside of the car is just before painting. I did the same seeping of POR 15 into
all the joints, shouldn't ever rust again if this stuff is as good as they say.
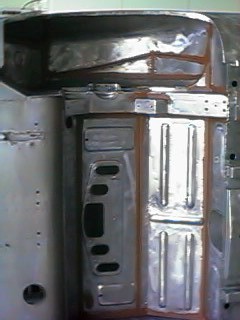
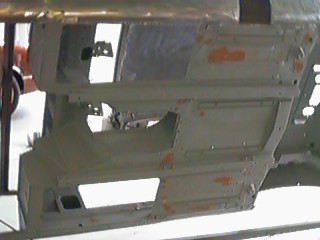
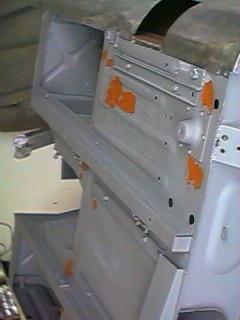
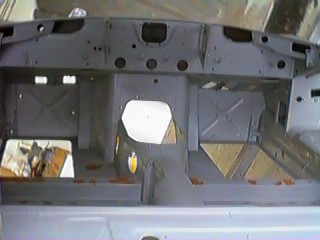 Another shot of
the inside of the body after prime. A few dots of primer on the main cross member.
The lack of major rust on this car helps make up for the substantial body damage
I painted all of the inner boxes as well in the dash with a combo of POR15 and
Epoxy primer, then shot a coat of body wax on top.
Another shot of
the inside of the body after prime. A few dots of primer on the main cross member.
The lack of major rust on this car helps make up for the substantial body damage
I painted all of the inner boxes as well in the dash with a combo of POR15 and
Epoxy primer, then shot a coat of body wax on top.
 Primed the rear
suspension frame at the same time, it will later get a coat or two of gloss black
epoxy, for now it goes into storage.
Primed the rear
suspension frame at the same time, it will later get a coat or two of gloss black
epoxy, for now it goes into storage.
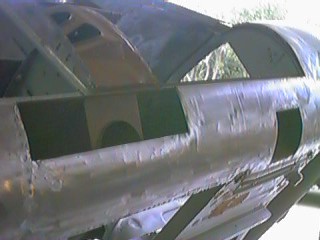
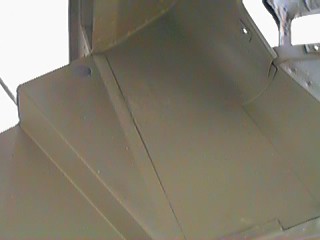 Had to include
this shot of the passenger side cowl. This had a large hole cut in it presumably
to allow access to the transmission bolts. I cut out the mangled area and welded
in a patch, then ground it down. Without use of any filler I was able to paint
it. Can't even see its there unless you really strain.
Had to include
this shot of the passenger side cowl. This had a large hole cut in it presumably
to allow access to the transmission bolts. I cut out the mangled area and welded
in a patch, then ground it down. Without use of any filler I was able to paint
it. Can't even see its there unless you really strain.
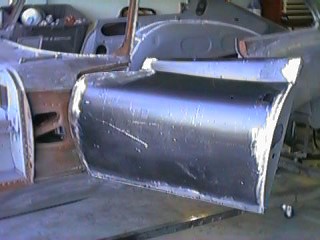
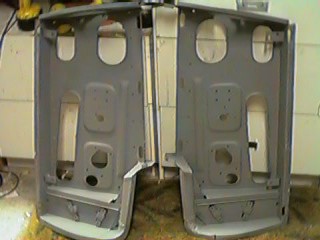 Door shells are
now ready for re skinning. I will sand off the paint in the weld areas and put
a weld through primer on first. Then install new skins.
Door shells are
now ready for re skinning. I will sand off the paint in the weld areas and put
a weld through primer on first. Then install new skins.
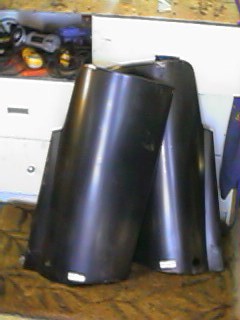 The new shells
from Martin Robey were about $60 each. I ordered a batch of sheet metal, including
new cowl, sill ends, door skins and floor pans, All of which was around $400.
Condition of the parts was good, and service was prompt and professional.
The new shells
from Martin Robey were about $60 each. I ordered a batch of sheet metal, including
new cowl, sill ends, door skins and floor pans, All of which was around $400.
Condition of the parts was good, and service was prompt and professional.
 The first order
was to test fit the skin on the shell to see how everything lines up. I sanded
the paint off of the inside of the door where the welds would be, and dressed
the shell to get out all of the high and low spots which later could cause problems.
This process took about 2 hours and ten or fifteen trial fits. Vice Grips are
a must when doing fitting like this. I have several pairs of large welders Vice
Grips which were large enough to reach around the shell and lock the entire skin
in place on the frame.
The first order
was to test fit the skin on the shell to see how everything lines up. I sanded
the paint off of the inside of the door where the welds would be, and dressed
the shell to get out all of the high and low spots which later could cause problems.
This process took about 2 hours and ten or fifteen trial fits. Vice Grips are
a must when doing fitting like this. I have several pairs of large welders Vice
Grips which were large enough to reach around the shell and lock the entire skin
in place on the frame.
I removed
the drip tray from each door and bead blasted it. These are riveted and brazed
on so a torch is required to remove them. After I cleaned up the parts I refit
each and painted the hidden areas with POR 15. I mig welded the parts back
in place vs brazing, unless you are really good with a torch, stay away from
thin sheet metal. I use a dremil tool to dress the welds in tight spots like
this.
 After everything
perfectly fitted, Spot weld the inner braces to the skin. I use my mig welder
and drill holes in any place which needs a simulated spot weld. I've considered
a spot welder, but so far haven't really needed one. I get pretty good results
with the mig welder, not quite factory in appearance, but pretty close, and
so far all the welds are hidden.
After everything
perfectly fitted, Spot weld the inner braces to the skin. I use my mig welder
and drill holes in any place which needs a simulated spot weld. I've considered
a spot welder, but so far haven't really needed one. I get pretty good results
with the mig welder, not quite factory in appearance, but pretty close, and
so far all the welds are hidden.
 Here the skins
are starting to fold over. This is a touchy process, and really requires a door
skinning hammer. Door skinning hammers have a hooked head which is wide and
crowned so it gives just the right type blow to fold over the metal. After each
side is folded over I flatten out the edge with the same hammer and a dolly,
and then drill every inch and weld the skin on the frame.
Here the skins
are starting to fold over. This is a touchy process, and really requires a door
skinning hammer. Door skinning hammers have a hooked head which is wide and
crowned so it gives just the right type blow to fold over the metal. After each
side is folded over I flatten out the edge with the same hammer and a dolly,
and then drill every inch and weld the skin on the frame.
 The compound curves
on this skin require a few extra cuts along the edge to avoid problems. Tin snips
work well for these, but as usual some trial and error is required.
The compound curves
on this skin require a few extra cuts along the edge to avoid problems. Tin snips
work well for these, but as usual some trial and error is required.
 One part of the
process I didn't take any pictures of was the making of drip covers on the bottom
of the door, there are two on each door, I used the old parts as patterns and
cut and shaped new ones from light gauge sheet metal scrap. The doors are still
in rough shape but are ready for trial fitting on the car, For now I'll leave
them this way, but later will be trimming them down and cleaning up low spots
as the door area is leaded in. First I need to put the cowl on.
One part of the
process I didn't take any pictures of was the making of drip covers on the bottom
of the door, there are two on each door, I used the old parts as patterns and
cut and shaped new ones from light gauge sheet metal scrap. The doors are still
in rough shape but are ready for trial fitting on the car, For now I'll leave
them this way, but later will be trimming them down and cleaning up low spots
as the door area is leaded in. First I need to put the cowl on.
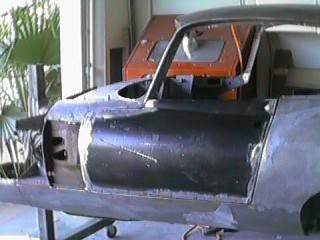 Not quite there
yet but nothing a couple dozen more hours of labor won't fix. So far I have about
8 hours in each door and who knows how many hours in the rest. at least a hundred
hours in body work I'd guess. Next the cowl goes on, the roof gets cut out and the
floor pans are installed.
More Body Work!
Not quite there
yet but nothing a couple dozen more hours of labor won't fix. So far I have about
8 hours in each door and who knows how many hours in the rest. at least a hundred
hours in body work I'd guess. Next the cowl goes on, the roof gets cut out and the
floor pans are installed.
More Body Work!